Happy Thursday! It has been a long month for me and for those who keep up with the One Room Challenge it has been a BUSY month for a group of bloggers. I had the opportunity to participate in the One Room Challenge this Fall and I decided to share with you a tutorial from my room makeover.
I know that there is a lot of different ways to make signage...everything from using a Cricut machine to buying stencils...but this post was made for those who do not have any of those fancy things to create a stencil. Yep, you read that right...we are going old school...Pencil, ruler, and my own 2 hands. Sometimes you have to do something yourself for it turn out right.
I have been wanting to create a sign that says, "Love is the New Black" for a while...I actually made one on poster board, but I wanted a more permanent look. While I was getting ready to decorate my room for the One Room Challenge, I figured that I should just make one myself. This sign literally took about an hour (or less) to create and it cost me absolutely nothing.
Materials:
Scrap wood
glass jar
mis-matched sock or cloth of some sort
paint
water
ruler
sharpie
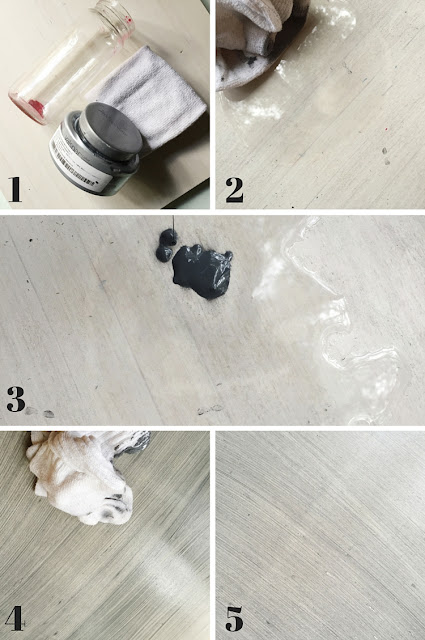
Before I go straight into the typography of the sign, Let me share with you how I created the "cool" paint technique. I really do to know what to call it. It was like I was staining the wood with watered down paint. I applied this same technique on my daughter's book shelf and depending on the wood species the effect may look different. The scrap wood I used on this signage had a wooden veneer on it so it did not soak in like I would have liked. Instead, it created a very unique, chic look to the wood.
Steps: Part 1
1. gather materials and fill jar with water
2. pour water on wood
3. pour paint on wood, mix water and paint together with cloth
4. wipe paint mixture on wood as if you were staining it
5. once you are satisfied with color and texture, let it dry. depending on wood species it may not have texture.
Now on to the typography
6. Once the wood has dried, draw light horizontal lines on the paper so that you can start writing your words
7. Free hand your letters, feel free to use circle templates for round letters
8. Trace your letters using a sharpie and a ruler
9. Fill in the thick parts of the lettering with paint
10. Paint the edge of the scrap wood to give it a clean look
11. Erase existing lines
Voila--the finished product. I have so many homemade signage it is ridiculous! Always remember, Good design has no limits...so get inspired and just do it!


19 comments
I am loving this method; the old school method! Seems very easy and a DIY, that I could do! I will be pinning this, so that I can try this later and these would make great gifts too! Thanks for sharing!
ReplyDeleteThanks! Sometimes old school are more faster than busting out the cricut machine and technology.
DeleteLove it!!! I never thought to use a sharpie for the outline! So much easier to work with. Sharing and pinning!
ReplyDeleteYeah, that is my secret weapon! Haha! Thanks girl!
DeleteI so wish I could free hand letters!! I am the WORST at letters. I have a cameo silhouette on my Christmas list because I feel like I could make really great things with that. We'll see. It'll probably collect dust, but I remain optimistic!
ReplyDeleteHaha! Love you! I actually have the newest cricut machine and it is collecting dust. I attempted to use it once but I did not have the patience to deal with it. Haha!
Delete"Love is the New Black" I love it.... Great DIY project. Thanks for sharing!!!
ReplyDeleteThanks!
DeleteYou are so talented! I love that piece but I would not attempt it lol. It would look like my kids did it. You should definitely sell these in an Etsy shop!
ReplyDeleteAwww! Thanks so much!
DeleteLove it!
ReplyDeleteThanks!
DeleteThis is so cute and looks easy enough to do! Great post!
ReplyDeleteThis is a gorgeous DIY!! I think I could actually manage this one :)
ReplyDeleteI love how you broke this down and did it "old school". I love doing crafty things like this, but with a toddler running around, those things have been put aside (for sanity's sake!). Until then, I will live vicariously through people like you!
ReplyDeleteHaha! You made me laugh... That is how my life was when my kids were younger! Thanks Leah for stopping by.
DeleteLove this AND this little corner! The mix of the curtains and your pictures is so "hip." Your style is amazing Jess!
ReplyDeleteHaha! ...,I try! Thanks!
DeleteI love this so much!
ReplyDelete