Happy Thursday!
Boy, do I have a treat for y'all! If you follow me on any one of my social media channels (Instagram, Twitter, Facebook) you would have seen my sneak peek photo of this project. I have been dreaming up this project for the past two weeks and it is finally a reality.
Since this project has a bit geometry going on ---hint, hint, the herringbone--I thought I would share with you an awesome contest that happens every month called the The Fab Furniture Flippin' Contest hosted by Evey from Evey's Creation, Stacy from Anastasia Vintage, Charlotte from Ciburbanity, Lynn from Fern Avenue, and Carrie from Thirty Eighth Street. This month the contestants were asked to makeover a piece of furniture incorporating geometric shapes into the piece. One of the cool things about this contest is that every month a new sponsor will either sponsor some product to the contestants participating or the winning contestant can win products from the sponsor of the month, like what occurred when I participated in this contest.
I was asked to partake in this contest for the month of September as a guest judge. For all my new followers, earlier in the year when I participated in this challenge and won, see here. Here is some special news that I have not shared with anyone...This was the contest that made me take a second look at blogging and actually motivated me to get serious about it.
Materials
Hardboard- I purchased a 4'x8' piece from my local hardware store and had them cut it to size.
Scrap wood or 2x4's or 1x4's
Shim wood- I used 2 packages of 42 count purchased at my local hardware store.
Paint
Liquid nails glue
hammer
finish nails
First, cut hardboard to desired size. Then, create a frame using your scrap wood or 2x4's or 1x4's and attach the frame to harddboard using liquid nails and finish nails. For a visual, check out Brynne at The Gathered Home's post on DIY Floating Frameless Vintage Patent Art. Her tutorial is very similar to the way I created my frame.
Paint the front and sides your desired color. I chose to use CeCe Caldwell's Beckley Coal paint.
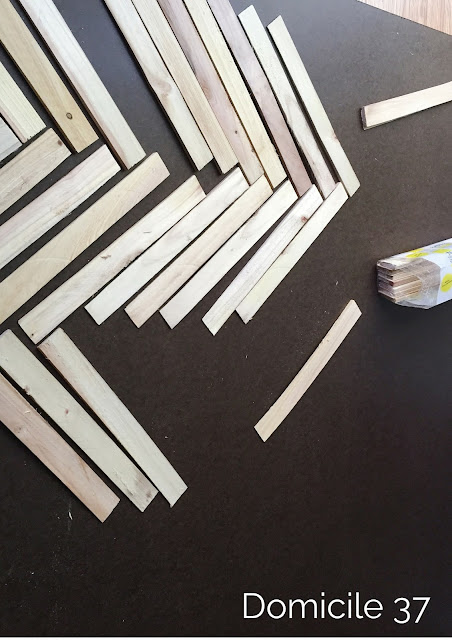
Prior to gluing down shims---figure out what kind of herringbone design you would like. Play around! It took me two days to realize that I liked my original idea, because all the different patterns looked so cool.
Paint or stain wood pieces. Please do note that shim wood comes in different wood species and cuts so if you plan to stain it, it may not be consistent.
This was one of the designs I liked! I had to share! There are so many different configurations, the possibilities are endless.
I decided on going with the traditional herringbone design and I made a homemade 45 degree triangle to help guide my angles so that everything stayed align.
Don't y'all hate it when you are looking for a tool while working on a project and you cannot find it, then once the project is completed, you find it?
That is what happened to me...I actually have a 45 degree plastic tool from when I was in college and I could not find it for the life of me and then once I started cleaning up the my project mess...I found it! Ain't that a shame?
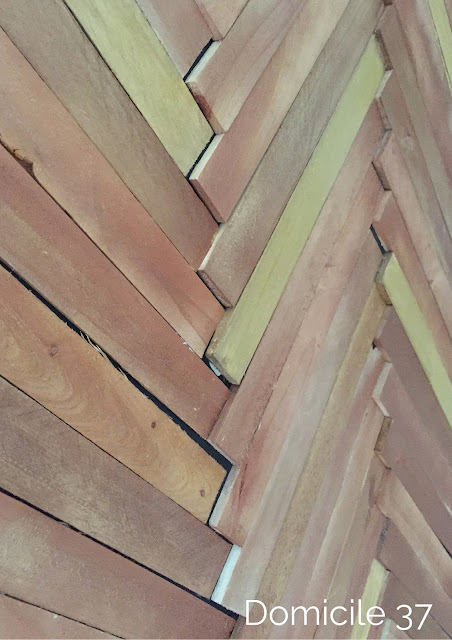
What I love about using shim wood is dimension and texture it gives off. The wood is sloped and when configured into pattern it gives off a 3D look, which is sensational!
The finished product! I used copper colored spray paint to speed up my project time and to give me the look I was going for. It still looks natural without looking metallic. I originally tried staining the pieces but each piece was coming out different due to the different wood species.....some looked pretty, while others looked ugly. I lightly spray painted the shims and really did not try to give them an even coat. I like the variation of the coppered shims.
If you would love to participate in the Fab Furniture Flippin' contest, email info@fabfurnitureflippincontest.com


22 comments
This is so good! Thanks for the tutorial! Are you sharing at my link party Something to Talk About?!
ReplyDeletePinning!
Karen
Thanks for the reminder! I need to stop by your link up!
DeleteMy brother is doing something like this with his floor right now. It looks fantastic! Great job.
ReplyDeleteHow cool! I would love to do this on a floor someday.
DeleteHow cool! Love it!
ReplyDeleteI love the mixture of black and wood. Aren't shims the best? So classy and sharp. :)
ReplyDeleteThanks! Shims are awesome!!!!
DeleteOOO I love this. Simple yet impacting.
ReplyDeleteThanks Bethany!
DeleteThis is so great Jess! I love that you always make fabulous things so inexpensively. :)
ReplyDeleteAwww, thanks Justine!...you know, I live on a budget!
DeleteLove this idea! I have a large wall in the living room and would to diy this, thanks for the inspiration!
ReplyDeleteAww, I am so happy I can inspire you!
DeleteThis is seriously so cool! I love crafts that deal with wood!
ReplyDeleteThanks! ...wood is making a nice comeback!
DeleteThis is such a cool project. I love that you have the herringbone on the side and not all over. Nice job!
ReplyDeleteThanks!
DeleteHow fun! This looks amazing! Great job!
ReplyDeleteThank you Jenn!
DeleteLove this-great job!
ReplyDeleteI love the look of this piece of art! So exciting to hear you are a guest judge this round. Good luck judging all the awesome projects!
ReplyDeleteI love it! The black + wood finishes are sooo good together! And I'm so glad that tutorial was useful :D
ReplyDelete